Friday, May 31, 2013

Product Corner: Ice cream makers

It's ice cream season in my house (betcha couldn't tell!) and I wanted to talk about ice cream makers, since I think the topic can seem a little daunting if you've not delved into making ice cream before.

The long and short of it is, there are 2 basic kinds of ice cream makers (not counting the old-fashioned kind that required rock salt and a front porch to churn on...): the kind with the cooler-lined cannister that you freeze, and the kind that has it's own cooling unit (condenser...sort of like your air conditioner) built right in.

Most ice cream recipe books will say that either is fine, and they're not wrong... mostly.

Here's the real scoop (ha ha! see what I did there?):

Cannister-type ice cream makers require you to freeze an inner liner, that looks like an ice bucket, until it's good and solid-- usually 24-48hrs before you use it.  Then, the other part of the machine will turn the frozen cannister, and there will be a paddle-like scraper/agitator attachment that will turn, churn, and aerate the mix as it freezes.  You usually can only use the cannister once, before you need to re-freeze it (I've tried making 2 batches in a row, and it didn't work in mine). 
Some of these are stand alone models (Cuisinart makes a very trusty one) and some are sold as an attachment for your stand mixer (samples of each below).


I used a Cuisinart version for years, and it was ok.  Good.  Definitely better than trying to, say, freeze ice cube trays of cream and then blend them-- that's just nuts.

This is the newest model of the trusty Cuisinart ice cream/yogurt maker. Mine's a bit older but basically the same.
The issue at hand is, how quickly the mixture freezes, which controls the size of the ice crystals, and the amount of air that gets mixed in.  Smaller crystals means a smoother ice cream, and some air, but not too much, will make the ice cream seem dense and lush, whereas too much air will make the ice cream seem fluffy and weird (the amount of air is call overrun, and is the difference between premium and non-premium ice cream you buy at the grocery store).  You want some air, but not a foamy mess.

So, the cannister style ice cream maker takes longer to freeze the ice cream (and you really need to start with VERY cold mix, so that you don't waste precious time of the cannister melting), and I found there to be a lot of inconsistency-- as you poured out a rather soupy soft-serve consistency ice cream, you would still have to really scrape the sides (risking scratching the "non-stick coating" on the surface) and there, the ice cream was rock hard.  Mixing everything quickly in a container and throwing it in the freezer for several hours, you would get a pretty good product in the end.  But I was stressed out and wanted the process to be easier and better.

After about 6 years of using my cannister-style, I invested last year in a not-too-expensive-if-you're-really-going-to-use-it-a-lot model of self-cooling ice cream maker.  It got good reviews all over, and I'm really happy with it (it's does beep weirdly, but maybe mine just got bumped in transit... works fine though).

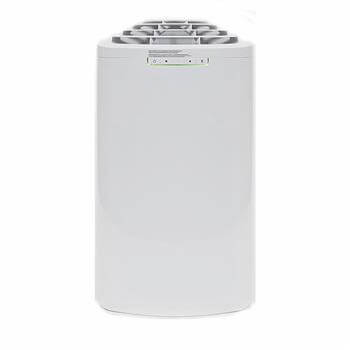
This is my current model. Whynter (and others) make bigger, more expensive models, but this one works just great.


The difference for me is: I don't have to perfectly chill my ingredients first (I'm not putting hot liquid in it, but from-the-fridge-to-the-blender-to-the-machine works just fine); it also creates firmer ice cream right off the bat.  I can stop it early, get the soupy soft-serve (which my husband actually likes...) or I can let it run longer, because there's no cannister that will melt and stop my progress.  And, I can make as many batches as I want in a day, or day after day.  Lastly, I don't have to give up precious room in my freezer for the cannister-- that room is MUCH better used by additional flavors of homemade ice cream!

So-- if you're just dabbing your toe in the ice cream pool (ooooooh... a pool of ice cream... with ice cream sandwiches as the floaties in the pool... yummmm), then by all means, pick up the cannister type, and see if you like making ice cream, if your family eats enough of it, and if it winds up on the yard sale table within a year or two.

If you're really committed, then I can definitely recommend you find yourself a model with a built in cooler (Whynter makes the above model and a bigger one, and Cuisinart makes a similarly priced model as well).

Happy Freezing!

Tuesday, May 28, 2013

By Request: Sugar-free Salted Caramel Ice Cream

My first request!

My friend F. asked if I could figure out a lower carb, lower calorie (because that's how I roll) salted caramel ice cream.  Since I love taking on a challenge, I of course immediately set about researching how to create this for her.


Problem # 1: not all sugar substitutes will caramelize. I can now list all the ones that won't, and there are some sugar substitutes that I didn't want to use in this recipe: maltitol, because it is one of the worst offenders in terms of "gastric distress" that can be caused by sugar substitutes, and erythritol, because I find even a small amount makes ice cream crumbly.

I *did* find that you can caramelize xylitol, which is great, because I use it to help with the texture of my sugar-free ice creams anyway.  The trick, it seems, is to add a tiny bit of an interfering agent, via an invert sugar, like corn syrup (you could use honey, though this isn't truly an invert sugar, but does contain it. It might make it taste a bit like honey though).
This is to prevent the creation of crystals in the caramel (an issue with caramel based on sugar, and I didn't want to chance it with the xylitol experiment). One teaspoon of corn syrup (which is not quite the same as "high-fructose corn syrup," which is much more processed) in the entire recipe will be quite distributed and the nutritional and blood sugar effects should not be pronounced, but will ensure that the caramel comes out properly.


Xylitol caramelization test (with a bit of cream)

So I ran a test with a small amount of xylitol and a drop of syrup (and some cream), and came out with perfect caramel. JOY!
We can proceed

Problem #2: finding a good salted caramel ice cream base recipe. 
I scoured the internet, and found a highly rated recipe that would be a good base for my changes.
The reviewers suggested the recipe could benefit from a couple of tweaks: a bit more salt, and some found it very rich.
I'm incorporating changes into my version to address these comments: decreasing the cream a bit, increasing the sea salt amount, and using liquid sucralose (aka Splenda) to replace some of the extra sugar, if its needed (note: I don't think it is).  The bulk of the sweetness will come from xylitol, which will be caramelized.  The rest would just be to taste.

Warning: making caramel is like making napalm in your kitchen. 
This stuff will cause permanent skin damage if it gets on you. TAKE PRECAUTIONS.

Wear long sleeves and long pants and good, closed-toe shoes. 
Baby-gate the animals and children OUT of the kitchen area. 
Have baking soda and a big pot lid, and an empty sink available.

Also-- it smokes. A LOT.  So open some windows and turn on the vent in advance.

So, with all that out of the way, here we go!

Ingredients:
1 1/4 c. heavy whipping cream.
3/4 cup xylitol
1 teaspoon corn syrup or very mild flavored honey, or agave syrup
1/2 teaspoon vanilla extract
1 teaspoon sea salt (could add another 1/4 tsp if you like it very salty)

1/4 c. additional heavy whipping cream
1 1/2 cups whole milk
3 large eggs
2 tablespoons glycerine
2 tablespoons vodka
(I thought it was sweet enough with just the xylitol called for, but if you think you need more sweetness, have 1/4 cup splenda (bulk, or the equivalent in liquid sweetener) standing by)

Directions:

First-- prepare for the hot caramel situation.  Block off the kitchen, get your safety gear, open the windows, turn on the vent.  Prepare mentally.  Don't answer the phone.  And you CAN take the pot off the heat now and then to check on it.  Go slow.
Have your 1.25 c. of heavy cream ready and standing by.

Next, in a very clean, very large pot, place the xylitol and the teaspoon of syrup (or honey or agave, whatever you are using).  Heat over medium until everything melts-- you can stir it with a very clean fork or spatula to get everything melted.

Once melted, you'll just swirl.  You'll start to see the color change slowly.  There will be some smoke.  It will smell like it's burning, because it is, that's the point.

Sometimes it might bubble a little bit, sometimes not. 

IT IS FREAKY HOT so be VERY CAREFUL.

Here is everything for the caramel, prepared:


Xylitol and syrup are melted.  Now the swirling starts


Very faint color change, to a very very pale yellow

Now a pale gold, and the smoking has started


More like a light honey color


Getting deeper, like an amber, and a lot more smoke


Darker amber - this is where I decided to stop and pulled it off the heat.  This took about 10 minutes or so, but depends on your stove, so just stand there and keep an eye on it and swirl.

Next, off the heat but still very very very hot, I add the cream 1 1/4c. cream

This is why you have to use a much bigger pot than you would think-- LOOK at the bubbles!

Once it calms down, you can stir in the vanilla and sea salt, and let it cool to room temperature, and go on with the recipe.


Once you've calmed down, you should make the custard.  Yes, I'm going to do the whole custard thing for this recipe, maybe it'll become a regular occurrence (or not).

So-- bring the milk and the remaining cream just to a boil in a small heavy saucepan, stirring occasionally.

In a medium bowl on the side, lightly beat the eggs, then add half of hot milk mixture in a slow stream, whisking constantly. Pour back into saucepan and cook over medium heat, stirring constantly with a wooden spoon (a heat-proof spatula will be fine too), until custard coats back of spoon and registers 170°F on an instant-read thermometer (do not let boil or stop stirring- yuckiest scrambled eggs ever).

Remove from heat and pour custard through a fine-mesh sieve into a large bowl, then stir in cooled caramel mixture. Add in the glycerine and vodka (these help with texture and scoopability in sugar-free ice creams). Taste the mixture (the eggs are cooked at this point) and sweeten if needed,using extra Splenda or liquid sweetener, to taste.  Keep in mind cold foods taste less sweet than warm ones, so err on the side of a bit sweeter. I didn't think it needed any extra, and after it froze, I thought it was  perfect. 


Chill custard, stirring occasionally, until very cold (especially if you are using a canister-style ice cream maker).
Freeze the mixture in your ice cream maker according to maker's directions (it will still be quite soft), then transfer to an airtight container and put in freezer to firm up, 2 hours at least, more if you can keep your hands off it.


Here it is, quite soft after not-quite 2hrs in the freezer- I actually added another 1/2 scoop to the serving.

Verdict:
Since I don't eat this flavor often, or really, at all, this was new for me.  I thought it was  A-MAZING!!!  I might try to get the caramel a bit deeper in color (but given the smoke, maybe not) and maybe a pinch more salt.  But overall, YUM!


Nutritional Info:
Assuming 8 nice size servings:
304 calories

20g of fat (12 saturated, 6 monounsaturated, 1 polyunsaturated)
147mg cholesterol
302mg sodium
128mg potassium
23g carbohydrate
18g fiber (counting the xylitol here as well)  So 5g net carbs for people who count those.
5g protein
9% of your day's calcium
16% of your vitamin A
12% of your B2 (riboflavin)

Full props for the sites I used for my research:
http://www.foodiefiasco.com/almost-calorie-free-caramel/
http://www.davidlebovitz.com/2009/01/why-and-when-to-use-or-not-use-c/
http://www.epicurious.com/recipes/food/views/Salted-Caramel-Ice-Cream-354517

Dreaming of Ice cream

In my quest to make the perfect sugar free ice cream (because really, I just want to enjoy it, and if I can save some calories and even one gray hair from worrying about that, then I will). 

I've found several references about how to make one of my favorite flavors, Cherry Garcia (mad props to Ben & Jerry for creating this masterpiece years ago) (is there really any *bad* flavor of ice cream? Isn't it like pizza and sex? I digress...) and I'm going to attempt it today.

Here are my tweaks to make this slightly lighter in calories, by cutting some sugar out, and reversing the proportion of milk and cream.  Also, I never make an actual cooked custard first, because I'm really impatient. Sigh.

Ingredients:
1/4c, rounded, dark chocolate chips or shavings. 
(You can make your own sugar-free dark chocolate by melting some unsweet chocolate with a bit of heavy cream, adding some sweetener, and pouring onto a piece of aluminum foil on a tray. Let that freeze up, and break into chips.  It will work in ice cream, but will melt a bit at room temp.)

1/4c, rounded, cherries.  The references I've seen say to use fresh Bing, but I'm going to try some canned (in syrup) ones.  Easier to get year-round.  Ensure they are pitted and chopped a bit.
 
pinch of salt
 
1tsp vanilla

Soren's lower cal, lower carb ice cream base (2c whole milk, 1c heavy whipping cream, 2 large eggs (or powdered lecithin), 2T glycerin, 2T vodka, 1/4 xylitol, extra sweetener to taste)

Directions:
Chill the chocolate and cherries. You'll add these almost at the end.
You *can* make a custard from the dairy and eggs and sweetener, and then chill that.  I don't bother, but maybe I'll try this again some time.
Anyway, combine the ice cream base, vanilla, and salt in a blender and get it good and blended.
Pour into your ice cream maker and freeze according to maker's directions, 20-30 minutes or so.

Just before it's done, mix in the chocolate and cherries and let it mix for another few minutes. Or, if you always miss the end, like I do, scoop out the ice cream into it's final container, mix in the chocolate and cherries by hand, and jam it in the freezer super quick!

Let it freeze for a while (like 2hrs or overnight) before serving, to let the flavors blend and everything set up a bit.


Finished product, though it needs to set. But I'm impatient. I did add extra cherries and chocolate, partly because hubby shredded a lot of chocolate, and because I thought it needed more cherries!

Tasting note: I think I'll try this with fresh cherries, but first, I'll taste it after it sets up for a day... I'm not getting a lot of cherry flavor right now, 1hr out of the churn

Hey! No math this time!

ETA: Nutritional Info

My lower-cal lower-sugar ice cream base makes 8 servings, and has this info:

205 cals per serving (not counting mix-ins) (1640 calories for the whole base recipe)
14g fat (9g saturated, 4g monounsaturate, 1g polyunsaturated)

102mg cholesterol
59mg sodium
132mg potassium
10g total carbohydrates
6g fiber (so that's 4g net grams, if you count those-- we are subtracting fiber and the polyol as well here)
4g protein
10% of your daily calcium
12% of your vitamin A
11% of your B2 (riboflavin).

Add to this, your values from the chocolate and cherries, depending how much you used

the brand of 85% chocolate I used:
1.4oz = 230 calories, 15 g carb (6g fiber)

1c of cherries (recipe calls for less): 135 calories, 34.5g carbs, 3.8g fiber


Sunday, May 26, 2013

Awesomesauce, aka pure maple syrup

In enjoying my sometimes-treat of pancakes this morning, I wanted to share my appreciation for pure maple syrup with you. 

Yes, it has a bunch of calories (220 per 1/4 cup) and that is pretty much all coming from carbs... But it also has 25% of your day's riboflavin, 15% of your manganese (and really, where else do you get such tasty manganese?), and some calcium, magnesium, and zinc. 

But, you probably won't use a full quarter cup, and as a special treat, nothing beats the real stuff. Yes, I do keep sugar free "pancake" syrup in the house, and it doesn't totally suck... Modern chemistry can closely mimic the viscosity and the overall "maple" flavor, enough to wet a weekday waffle. 

But it does NOT truly compare to the fresh amber nectar we picked up at a local maple farm this spring. We went for a few hours over the Easter holiday weekend, and enjoyed all the typical events: giant pancake-pork-product-baked-goods-and-beans breakfast, demonstration of how syrup is made now and tasting, and a self-guided tour through the woods, showing the history of maple syrup. We learned a bit about how the settlers learned about maple sap from the indigenous folk, how they would set up special camps away from their farms, just for the few weeks the sap flowed (once the trees bud, the sap isn't as sweet and we don't use it at that point). 

Old-school pioneer way of reducing sap to syrup. It's a 40:1 ratio to go from watery to delicious


We had the super-special treat of maple taffy  on snow, and learned about modern sap collection. 

Boiling syrup until thicker is what makes it taffy, then rolling it yourself makes you feel like you did something

A totally worth-it experience, and I recommend it highly for both families and, well, everyone. 

Ok, back to the sticky matter at hand. There are (basically) 3 grades of syrup: light, amber, and dark. These do not relate to cooking or processing, but actually have to do with when in the season the sap is collected. Earlier is watery-er, hence, lighter.   I like amber and dark, though they suggest dark is good for cooking with, I like it as a condiment. 
We found the light to be too light, but your mileage may vary, as they say. 


So, next time you whip up a batch of your Aunt Jemima's best pancakes or waffles (#noshame), do yourself a flavor favor and bust out the good stuff. You're worth it. 

Math: did you catch the 40:1 ratio?  

Friday, May 24, 2013

My favorite salad

I'll be honest: I don't like salads.

I sort of like them when someone else makes them, but when given a choice, I generally choose *not* to have a salad.

There's some emotional baggage here, of course.  Weight loss plans generally involve copious salads.
My mother blames herself; she says that she focused her "new food" energy when I was a baby, on cooked veggies. Her logic was that most kids didn't like cooked veggies, but *everyone* eats salad.
Let that be a lesson to you moms out there!

Regardless, I'm an adult now, and I know that leafy greens are good for me, and that there are many tasty choice now (as opposed to iceberg or romaine, our only choices in the 70's), and my darling husband DOES like salad (weirdo), so I try to compromise and keep some fixin's in the house.

I've found that there is an arugula/spinach blend that I like, and it doesn't rot immediately after getting it home (my main issue with other lettuce blends).

I also learned about a FANTASTIC flavor combination from my friend Nic (@NicCanCook) from years ago at his restaurant (this isn't on the menu anymore though).  So without further ado, here's my one favorite salad that I make for myself.

Roasted pepper and goat cheese (and other stuff) salad

Goat Cheese and Roasted Red Pepper (and pork chop) salad


Ingredients:
1 roasted red pepper (from a jar, or fresh if happen to have them lying around)
2-3oz of soft unripe goat cheese, the kind that doesn't have a rind, that just looks like creamcheese
a few T of leftover onion (red, white, green, whatever you have)
3-4c salad greens (big single salad) (I like arugula/spinach, but this works on romaine, or whatever you have)
italian dressing (seriously)

Method:

Place the clean salad greens in a big bowl

Cut the roasted red pepper into small pieces, or slices, whatever you like, add to the bowl
Do the same with the onion

Crumble the goat cheeese over everything
Add in some protein if you like-- this works great with chicken or pork leftovers. Beef would be fine too.  Pretty much anything other than fish, I think.
Top with a couple T of italian dressing, or balsamic/oil and some herbs.
Toss to combine.

YUM! and? no math...

ETA: nutritional information
This of course depends on the actual products you use, and the amounts.  I'll give you a rough estimate, you'll need to multiply it out:
1oz soft goat cheese = 76 cal, 6g fat, 0.3g carb, 0 fiber, 5.3g protein
1 roasted red pepper = 10 cal, 0 fat, 3g carb, 1g fiber, 0g protein
1 T chopped onion, raw = 4 calories, 1g carb, negligible everything else
1c arugula = 5 calories, 0.7g carb, 0.3g fiber, negligible everything else
salad dressing - your choice of brand

Thursday, May 23, 2013

Product Corner - Low Sugar jam vs. Double Fruit

Lately, I've been eating a LOT of 0% greek yogurt with some SF (sugar free) jam, and needed to replenish.

I usually buy Smuckers brand No Sugar added jams.

I know they are made with concentrated grape juice as the sweetener (so, sugar, but let's not get hung up on *words*), and depending on the flavor (and where I buy it, i.e. Canada or the US) it's about 20 calories per Tablespoon.

It costs 4.99 for a 310ml jar. (that's $0.0161 per mL)


So I finally decided to check out OTHER jam. I wound up sticking to the double/triple fruit kind, because as I looked through the labels, I saw right away, regular jam, OMG, high calories! That stuff is pure sugar (or high fructose corn syrup... don't get me started).

Back to the comparison.

The Smuckers brand Double Fruit ALSO has 20 calories for 1 Tablespoon, has sugar in place of the grape juice, and that's about it for differences.

However, it costs 4.29 for a 390ml jar. ( that's $0.011 per mL)


And my store's own "healthy" line (the labels are blue, and are always less fat, less sugar, less sodium, than the competing brand)-- a 500ml jar of "twice the fruit" strawberry for 3.99.
And it's 25cal per tablespoon. 


So, for less money, a much bigger jar, and basically the SAME product, I'll be going with store brand double fruit from now on.


It pays to read the labels, folks.  And as always, MATH!

Product Corner - Dreamfield's low carb pasta vs. whole wheat

I used to be very seriously into low carbing.  Now, I've progressed to monitoring calories, and carbs to a certain extent but not as militantly as I had previously, and I generally try to eat deliciously with an eye toward healthfulness.

That said, I started to wonder if paying extra for the "special" pasta produced by Dreamfield's (long story short: they claim to have a proprietary recipe and manufacturing process that prevents you from absorbing the carbs in the product, which is made with durum wheat semolina.)


So, I bought some of my grocery store brand's "healthy menu" whole wheat pasta to compare to Dreamfields, to see if maybe I can get away from spending the extra $ if not needed.

Here is my super-mathematical analysis:Dreamfields (375g box costs $3.79 CDN)--
serving of 2 oz dry (56g), it's:
190 cal
41g carb total
5 g fiber (3g soluble, 2g insoluble)

Whole Wheat (375g box costs $1.49 CDN):
serving of 75g dry (so, that's about 1/3 more?):
270 cal
54g carb total
8g of fiber (2g soluble, 6g insoluble).

I broke out calories/gram

Dreamfields: 190/56 = 3.39 (let's call that 3.4)
Whole wheat: 270/75= 3.6

so that's .2 cals per g difference.

If I work that back to the same size serving as the Dreamfields (56g), the whole wheat comes to about 202 cals.

So, it's about 12 cal more per serving (if 2oz is the serving) and perhaps a touch more fiber.

Given that Dreamfields is a bit iffy on the whole "our carbs magically don't get processed by your system" thing (your mileage may vary, I've heard the whole gamut on whether they impact blood sugar etc.)-- my conclusion is that I can buy the whole wheat pasta instead. And save $2.30 per box.


Did that make sense?  MATH! It wins every time!

btw-- pasta is a sometimes-treat for me (as Cookie Monster now says about cookies...). I'm pretty convinced about the whole gluten/wheat/wheat-belly-the-book thing, but I do like a little pasta now and then. Moderation is key.

Product Corner - Best Electric Kettle EVER

This is less of a comparison, and more of a OMG I LOVE THIS kind of thing...

Full credit to my friend D, who introduced me to the concept of the variable temperature, cordless, electric kettle.  Silly me, I was still boiling water on the stove or in the (gasp) microwave.

After some deep internet searching, I decided on the Breville variable temperature kettle. My model looks like this:
I this kettle, seriously.  And my husband uses it for his french press coffee-- who knew you shouldn't use fully boiling water for that? Well, we do now!

I also now know, thanks to the geniuses at David's Tea, that each variety of tea requires its own temperature of water, and specific brewing times.  If you think you don't like tea because it's bitter, you're probably not brewing it right.  I know, right? WHO KNEW?

Well, this simple little device has changed my life, beverage-wise.  I drink a lot of iced tea, and to brew it fresh, you simply use 2x the amount of tea for a given amount of water-- 1/2 of what fits in your container. 
Hmm... this is turning into a math problem. Let's use some numbers:

Let's say you want to make 1L of iced tea (32oz).
So heat about 16-18oz of water, to the right temperature for the type of tea (green, white, oolong, black/herbal).

Steep 2x the amount of tea for that amount of water (i.e. 1.5tsp for 16oz of water, so use 3tsp for your iced tea adventure).

Next, fill your container with about 16oz (2c) of ice, then pour the hot tea over the ice.  Sweeten to taste.
You'll have the right amount of iced tea, at the right concentration. 
Magic? No! Math!

Roasty Goodness - Cauliflower

Yes, that's right, cauliflower.  It's low carb, has a good amount of fiber, and has a ton of vitamin C, as well as Vitamin K, folate, B6, and potassium.  It's true, look it up!

Most cruciferous (your $.10 word for the day) veggies are more tasty when they are cooked, but not over cooked.  And really, boiling = waterlogged.  Steamed? Ok, but a bit boring, no?

Enter, roasting!  Set your oven on HIGH (like, 450 degrees) and get out your oil spray (if you are watching calories, which I do on occaision) or drizzler, some salt and pepper, and get ready for a real taste treat.

Here's what to do:

Trim a head (or 2) of cauliflower. Cut off the leaves, trim the stem (but you can keep it), and scrape off any brown bits from around the florets

Line a flat (or low rimmed) baking sheet with aluminum foil or parchment paper (which might get a bit toasty, but will still be ok).

You can drizzle some oil on the sheet at this point if you want to.

Now, you can either cut the cauliflower head into about 1inch sized slices - yes, it will crumble a bit, but that's ok.  Or, you can break it into florets, which works fine as well.

Here it is, sliced:
1 head of cauliflower, sliced and laid out
 Drizzle the cauliflower with olive oil, and if you have it, flavored olive oil-- I used garlic oil, in my spritzer, so I'm just using a very small bit, but it really helps with the browning and flavor. 

Sprinkle liberally with salt (I like herbamare seasoned sea salt) and fresh ground pepper. 
Put in your hot hot oven for about 30 minutes or so, keep an eye on it.  You do want it quite brown, that's where the flavor is.
Flip the pieces about 1/2 way through, but if you forget, that's ok.

Here's the finished product, before we gobbled it all up!

1 head of cauliflower after roasting
It's great hot from the oven, but I like it cold too, as part of a salad... oooh! idea for lunch tomorrow!

Summer (food) Lovin'!

I love that the GTA seems to go right from "end of winter" to "full on summer" in a snap.

My garden is in full swing already:

From Left: Gooseberries, strawberries and chocolate mint, rhubarb, red currants, zucchini
And here are the window boxes:
Orange mint, baby basil, and oregano
 

Wee tiny basil in the far corners, and my perennial chives
So, I'm excited for all the herbs, especially a huge crop of basil.
Meanwhile, I harvested the three largest rhubarb stalks, which yielded a full POUND of rhubarb.

What to do, what to do?
Strawberry rhubarb cobbler, naturally!

I try to eat "lower carb" on a regular basis, so I modified a few different recipes (mostly, the lighter strawberry rhubarb cobbler recipe from cooksillustrated (note: you need to sign up to access their recipes).

I also made sugar free vanilla bean icecream (with my own homemade vanilla)-- here's the total result:
Strawberry rhubarb lower-carb cobbler, with sugar free vanilla bean icecream
First, the ice cream recipe:

This makes a great base for any sugar-free icecream.  You may just need to adjust the sweetness, for different flavors like coffee or chocolate.

Ingredients in the base:
2c. whole milk
1c. heavy whipping cream
2 eggs (yes, raw eggs.  you could substitute lecithin powder if you prefer)
2T. glycerin
2T vodka
1/4c. xylitol (do NOT use erythritol. It makes it crumbly)
pinch of salt
additional Splenda (liquid or powder) or other sugarfree sweetener to taste
 
Flavor options:
2-3T excellent vanilla extract
or
1/3c excellent cocoa powder (might need more sweetener)
 
 
I used my own vanilla extract (10 vanilla bean pods, split down the middle, immersed in an almost-full bottle of very cheap vodka.  Sit that in your cupboard for at least 8 weeks, shaking it once daily).
 
 
Directions:
Blend all the ingredients you choose to use in a blender, then pop into your ice cream maker of choice.  I'm using a Whynter Sno ice cream maker, but any brand would be fine. Follow the maker's directions.


Next, the Strawberry Rhubarb cobbler.
 
The basic premise is to remove some of the liquid from the fruits by roasting them first, and thickening with a bit of starch.  Flour makes it too glumpy, and we're going for a lighter texture.
I 1.5x the recipe, to use up all my rhubarb.
 
Ingredients:
16oz of rhubarb, cleaned and cut into about 1/2inch chunks
3c (about the same weight) of strawberries, rinsed, hulled, and cut into large chunks if they are big
1T of corn starch (could be potato or tapioca as well)
2T coconut palm sugar (slightly lower glycemic index)
2T or so granular Splenda (or other sweetener to taste-- could try all Splenda)
Low Carb Biscuit mix of your choice-- use enough to make 6 biscuits, and add about 1/3c splenda to the mix
Cinnamon/sweetener mix to sprinkle on biscuits
 
Directions:
Heat oven to 400 degrees.  Meanwhile, mix the fruit, starch, sweeteners of choice. 
Pour into a 8x11 pan (I used the smaller glass pyrex) and place on a cookie sheet covered with either parchment paper or aluminum foil (in case it bubbles over).
Bake the fruit for 20-30 minutes, until juices release. SET A TIMER!
 
When the fruit is done, remove from oven, lower oven to the temperature specified for your biscuits (mine was 350), and give the fruit a stir.  You might need to at a tablespoon of water, if it's not quite juicy enough, but you don't want it runny.
 
Mix up your biscuits and add the extra sweetener to the mix.  Drop in 6 even blobs over the fruit. Top the biscuits with a sprinkle of cinnamon/sweetener (I had Truvia on hand).
Return to the oven and bake for another 20-30 minutes, per the biscuit directions.


Lower Carb Strawberry Rhubarb Cobbler fresh from the oven


Remove from oven and let cool so you don't burn your mouth to shreds!


Enjoy warm or room temp, with ice cream!

ETA: Nutritional Info

This depends on your bicuit mix-- low carb or made from scratch.
Giving full credit to cooksillustrated.com who made biscuits from scratch and used a full 1/3c of sugar in the berry/rhubarb mixture, the info would be:


280 calories
52g carbs, 4g fiber (this would change of course based on your sweetener, if you use all the starch, and what biscuits you use).